Wednesday, January 30, 2013

How To Speed Up Firefox Optimization Guide


     If your Firefox is slow or misbehaving, here are some tweaks to speed it up. Firefox 17.0.1 has just been released These initial steps are a basic requirement to keep Firefox running smoothly and safely – there is little point trying to improve performance if you are using outdated and insecure components…

       1. Update Firefox – if you’re not running the latest version you are more at risk from unfixed vulnerabilities and will not benefit from the latest technical improvements: Select Firefox (or Help from the menu bar) then ‘About Firefox’ and press the ‘Check For Updates’ button. Apply updates if available then retry – the Check message should confirm ‘Firefox is up to date’.

       2. Remove extensions you do not need – the more extensions you have enabled, the slower and less stable Firefox may become: Select Firefox (or Tools from the menu bar) then Add-ons to open the Add-ons Manager. Click on Extensions and, if you no longer need an extension, Remove it – if in doubt, at least Disable it.

       3. Update extensions – the easiest way to always keep extensions up to date is to open the Add-ons Manager and click the Tools ‘cog’ at the top then select (tick) ‘Update Add-ons Automatically’. To perform a manual update, click the Tools ‘cog’ then select ‘Check for Updates’ and apply any that are found.

       4. Disable plugins you do not need – as with extensions, the more plugins you have enabled, the more problems Firefox may encounter: Open the Add-ons Manager. Click on Plugins and, if you do not need a plugin, disable it. If you disable a specific plugin and ever do visit a site that needs it, just re-enable it. [The only plugins enabled on my system are Shockwave Flash and Silverlight for streaming videos. Amongst my disabled plugins are Microsoft DRM x 2, Quicktime, VLC, Windows Media Player and Google Update - none of which I have ever needed].

       5. Update plugins – plugins from third parties such as Adobe and Oracle are often targeted by malicious websites so it is important to keep them up to date (and new versions often include performance benefits): Now that you have Firefox, extensions and plugins optimized and up to date, progress to the next section.

Backing Up
      The next section tweaks Firefox configuration by changing or adding preferences in about:config. You should make a note of the ‘before’ and ‘after’ values of each tweak and (highly recommended) backup the Firefox preferences file that contains all these options first – in case you want to revert back to your original settings:

        The configuration file is called prefs.js and is located in the system partition (usually C:\ drive):

        In Windows XP \Documents and Settings\\Application Data\Mozilla\Firefox\Profiles\.default\ 
        In Vista and Windows 7 \Users\\AppData\Roaming\Mozilla\Firefox\Profiles\.default\ 

        You may need to show hidden files to view the folder. Close Firefox first and then copy the prefs.js file to another location on your hard drive for backup.

        Tweaking Firefox Open Firefox and type about:config in the address bar then press Enter. Click the “I’ll be careful I Promise” warning button to reveal a long list of preferences. 

        To change a preference – if it is an integer (number) or a string (text), double click on the preference name and you will be prompted for the new value. If it is a Boolean (true or false) value, double click the entry to switch from true to false or vice versa. 
        To add a preference (if the preference name is not already listed in your about:config page) right click on an empty space in the about:config window and choose New followed by String, Integer or Boolean depending whether the value of the preference is text (String), a number (Integer) or true/false (Boolean) 

    Tip: The quickest way to find the right preference is to type part of the preference name into the Filter bar at the top of the config page – this automatically reduces the list to show only those preferences that include the text you typed. 

       Change or add the following preferences to the new values shown. If the preference is already set to this value then skip it and move on the next. If the preference does not exist then you need to add it: 

browser.display.show_image_placeholders: false

       Stops the display of placeholders while images are loading to speed up the page. Default is True

 browser.tabs.animate: false

       Disables all tab animation features (e.g. when you click the ‘New Tab’ (+) button) to make the tab interface feel quicker. Default is True network.

prefetch-next: true

       This setting can automatically prefetch (load) the contents of pages linked to by the page you are viewing e.g. to load the homepage in the background, making it quicker for you to view next if you want to. 
    
       To take advantage of increased speed when browsing websites which use prefetch, keep this setting at the Default which is True. 

       [Some view prefetch as a possible security risk and disable it. My current view is that it isn’t a major concern – if a site is bad, it will just load bad stuff on the current page anyway without needing to prefetch it from elsewhere] 

 network.http.max-persistent-connections-per-server: 8

        Increases the maximum number of persistent connections per server which can help speed up loading of multimedia rich sites. Default is 6 

network.http.pipelining: true 

       Can send multiple requests to a server together in order to speed up loading of webpages. This is not supported by ALL servers – some servers may even behave incorrectly if they receive pipelined requests. Default is False 
 Optional: if you want Google searches in the address bar to search by name and go straight to the right website (e.g. ‘New York Times’ would go straight to the nytimes.com website) rather than just perform a standard Google search, change the value of the keyword.url preference as shown below below: 

keyword.url: https://www.google.com/search?ie=UTF-8&oe=UTF-8&sourceid=navclient&gfns=1&q= 

(Note: this is for google.com – you may want to change it to your own country version e.g. for UK just replace the google.com bit with google.co.uk) 

Now close Firefox and re-open it to apply all the tweaks.

  Personalizing The Tweaks 
  
      The above tweaks improve speed and responsiveness in my own tests but your mileage may vary depending on your exact network configuration, sites visited and other software installed. One of the best things about Firefox is the variety of add-ons available but it does mean that there is an endless variety of possible configurations… 

      In particular the three ‘network.’ preferences may not be a ‘one size fits all’ solution for you – you may need to experiment to achieve the best settings for your particular installation e.g. by changing them one at a time to different values or back to the default setting. I provided the default settings above in case you wish to revert to them.

       Enable Click To Play  
       Plugins (e.g. Flash Player) can consume significant resources and slow down page loading. Click to Play configures all plugins to only load on click which can dramatically increase the speeds of media rich pages. Don’t Load Tabs Until Selected If you have set the option to ‘Show my windows and tabs from last time’ (in Options \ General) when Firefox starts, it may have to load multiple tabs – keen users may have dozens of open tabs which Firefox has to load in full each time it starts. This can really slow down the time it takes to open Firefox – a common complaint. To greatly speed up the loading process: In Options \ Tabs tick the 

‘Don’t load tabs until selected’ box and press OK – this menu option will still open all your saved tabs when Firefox starts but will only load the current tab which can save a lot of time:


Finally, consider whether your expectations are reasonable – I read of people complaining about performance when they have 100+ add-ons installed or 100+ open tabs or are using very old hardware – they may be simply overloading Firefox beyond its realistic limits and would face the same issues with any other modern browser.

How To Speed Up USB Flash Drives and External Hard Drives Data Transfer In Windows 7


     It's now easy in Windows 7 to increase the data transfer speed of your USB flash drives or USB external hard drives by enabling write caching in Windows. Here are the steps you need to follow:
       1. Connect your USB flash drive or USB external hard drive to one of your computer USB ports.

       2. Open now Computer window (Start Menu >> Computer), right-click on your USB drive and select Properties.


      3. Open Hardware tab, then double-click on your USB flash drive or external hard drive in the given list.


     4. Another window pops-up, open Policies tab, select Better performance option, then click OK.


      5. Click OK to exit all opened windows. That's it.

How to Reset Bios

   
  The CMOS is a small RAM that stores the basic configuration of your computer. This memory is volatile, meaning that once it is no longer supplied with electricity, it loses its data. That is why a battery constantly feeds the CMOS chip. Clear CMOS by removing the battery Turn off your computer completely Find the CMOS battery Remove the battery for two or three minutes, then return it to its place. All parameters of Bios will be deleted. It is possible that a message (Checksum Error) appears at the start of your system. You can simply try to restart. If the message persists, load the default settings of your Bios (Press Del, F1 or F2 to enter Bios setup and press “Load Optimized Defaults”).

   
      2. Clear CMOS using the jumper (clear jumper) Turn off your computer completely Then look for the clear jumper which is located on the motherboard as shown in the picture below:
 
    Just remove the jumper from pin 1 and 2 and place it on pin 2 and 3, wait for two or three minutes, then return the jumper to its original position. All parameters of Bios will be deleted. It is possible that a message “Checksum Error” appears at the start of your system. You can simply try to restart. If the message persists, load the default settings of your Bios (Press Del, F1 or F2 to enter Bios setup and press “Load Optimized Defaults”).

How to Tune a PC Performance

     Tuning a computer is as important as tuning a car. Over time, computers will run slower as programs, files, software and data are added. It is essential to perform regular maintenance to keep the computer running smoothly. All versions of Microsoft Windows include tools needed to keep your computer running efficiently without spending any money. Performing these steps once a month will help you keep your computer running at peak performance.

 Instructions :

      1. Run Disk Cleanup by clicking "Start," "All Programs," "Accessories," "System Tools" and "Disk Cleanup." Disk Cleanup will free up space on the hard drive by safely removing temporary files and downloaded program files and emptying the recycle bin. The Disk Cleanup dialog box will show you what files can be deleted. Check the boxes for files that you want to delete, then click "OK" and "Yes."

      2. Run Disk Defragmenter to consolidate fragmented files and folders on the computer's hard disk. When a file is fragmented, it takes longer for the computer to read it because it has to skip to different sections of the hard disk drive. To run Disk Defragmenter, click "Start," then type "defragmenter" in the search box. Click on "Disk Defragmenter" to begin.

      3. Delete programs that you no longer use. Click "Start" and "Control Panel," then double-click "Add or Remove Programs." Highlight the program to uninstall, then follow the instructions to remove the program. The "Add or Remove Programs" feature in Windows 7 and Vista is called "Programs and Features."

      4. Update your anti-virus software and run a scan.

Desktop Performance Tuning Tips and Tricks

      In 2011, a survey revealed that 50 percent of computer users consider slow speeds to be their most annoying computer issue. Interestingly, the survey participants favored rebooting, running a virus scan or compressing their files over buying a new machine. For those who share that sentiment, the Windows operating system comes with applications specifically designed to help get the most out of a PC without upgrading its hardware.

     Windows Update Windows Update downloads and installs Microsoft patches designed to fix security issues or other bugs, as well as increase the speed of certain applications. This tool also lets you download the latest drivers -- files the OS needs to properly communicate with peripherals such as a graphics or Ethernet card. You can enable automatic downloads and installation of patches and drivers by clicking "Windows Update" in the Start menu and selecting the "Turn automatic updates on or off" link.
 
     Task Manager The Windows Task Manager proves critical when it comes to identifying and solving performance issues, and its Performance tab contains two real-time graphs of your computer's most important resources: the central processing unit and random-access memory usage. If the graphs reveal CPU or RAM usage consistently near or at 100 percent, your computer may lack the processing power or memory required to run the applications currently open. The Processes tab, which displays the amount of CPU power and memory used by each application, lets you terminate a process by clicking on its name and selecting "End task." Quitting an application this way is not risk-free, however, because you might lose unsaved progress and/or other programs that depend on it could crash. Several Windows core processes, such as "winlogon.exe" or "dwm.exe," should never be terminated; when in doubt, research a program before terminating or deleting it. You can launch the Task Manager by right-clicking on the Windows taskbar and selecting it by name.

      Msconfig Among other features, the Msconfig utility lets you determine the applications your computer should launch at startup. To open this utility, click on the "Start" icon, type "msconfig" in the search field and select the "Msconfig" link. This tool's Startup tab contains a list of applications that have added themselves to the startup list. You may be surprised by how many appear there, even if you seldom use them; instant-messaging applications and phone and camera managers are particularly guilty of overusing this Windows feature. While some programs have a legitimate reason to run constantly in the background, a long list of running applications can significantly slow your system. You can remove programs from the list by unchecking the box next to them and rebooting your computer, but removing a program designed to interact with some of your hardware, such as a camera or printer manager, may prevent you from using some of the associated device's features until you manually launch the application.

     Performance Index The Windows Experience Index, found in the Control Panel under "Performance Information and Tools," assigns a number that represents your computer's ability to run advanced visual Windows features, with 1.0 as the lowest score and 7.9 the highest. To assign a score to your computer, the EI tool uses a testing routine that evaluates several core components of your computer, such as the amount of memory and the speed of your graphics card. To run the testing routine, select the "Re-run this assessment" link at the bottom of the Windows Experience Index window and wait for the test to complete. A window will appear with suggestions of features to turn off to improve your computer's performance, if necessary.

      Event Viewer The Event Viewer tracks important Windows actions that may reveal the source of your computer's slowdown. Microsoft explains that “events” are “programs that don't start as expected or updates that are downloaded automatically,” and include issues related to security and the operating system itself. You’ll find this tool in the Control Panel by clicking on “System and Security” and “Administrative Tools” before double-clicking on “Event Viewer.” This utility contains a number of categories and event logs, with subcategories nested beneath them, so it takes some effort to find what you need. Under Applications and Services Logs, you can review a list of error events; double-clicking on one reveals a description of what happened. Many event descriptions also include an “Event Log Online Help” link to facilitate troubleshooting.

     Disk Cleanup Your computer uses its hard drive for storage of documents, movies and other static content, while open applications typically employ RAM modules, or sticks, inside your computer to store temporary files. If a program needs more space than the modules have available, it may access your hard drive to store temporary data. Over time, your hard drive can accumulate unnecessary content, from temporary Internet files to downloaded programs. The Disk Cleanup tool deletes them from your machine safely. Find it by typing "Disk Cleanup" in the Start menu's search box and pressing the "Enter" key, then select the types of truly unnecessary files you want to delete from your system by activating the check boxes next to them before clicking "OK."

      Disk Defragmenter When your computer deletes a file, it erases only the hard drive sectors that contained that particular file, leaving a hole between the file stored before the deleted file and the one stored after it. Over time, your hard drive partitions start to look like Swiss cheese, and when saving new files, your computer must divide the files into smaller chunks to fit them into the available holes. Retrieving those file fragments can dramatically decrease your computer's performance, but Windows' Disk Defragmenter reorganizes the fragments, making it easier for your computer to retrieve and store information. You can launch it from the "System Tools" folder, inside the "Accessories" section of the Start menu.

      Registry Cleaners The Windows registry contains a list of core settings for your operating system and third-party applications. Uninstalled programs may leave some of their data behind, leading to a cluttered and inefficient registry that slows your computer. Microsoft no longer supports its registry cleaner for Windows, but you can use one of several available third-party tools to clean the registry. CNET's Download.com website recommends WinASO Registry Optimizer, Advanced SystemCare Free or CCleaner, which are all free. Downloading a trusted and vetted product is vital, because malware posing as a cleaner can wreak havoc with your system.

How to Create a Playlist on YouTube

     YouTube is one of the largest video databases on the Web. This site features an unbelievable number of creative, hilarious and often bizarre videos that are free to view, share and enjoy. One of the best ways to enjoy YouTube is to create a personal Playlist.
 1. Go to the YouTube home page (see the Resources section below).
 2. Click 'Log In' if you aren't already identified by the site. If you don't yet have an account, click 'Sign Up' and register before proceeding.
 3. Find the 'My' heading and click 'Playlists.' A Playlist is similar to a Quicklist except that a Quicklist is temporary and isn't saved when you close your browser. A Playlist can be saved, manipulated and shared.
 4. Select 'Create Playlist.'
 5. Write a name, description and any tags you'd like to include for searching purposes.
 6. Choose whether you want the Playlist to be public or private. A private list is shared only with other members you designate.
 7. Click 'Save Playlist Info.' 
 8. Add as many Playlists as you choose. Add Content to Your YouTube Playlist
 9. Click the 'Videos' link from the Playlists page, or click the YouTube logo.
10. Browse through the available content and locate a video you'd like to include in your Playlist.
11. Click the video.
12. Select the 'Save to Favorites' text link.
13. Find the 'Select a Playlist' pull down menu under the 'Add Video to Playlist' heading.
14. Choose the Playlist you'd like to add the video to and click 'OK.' 
15. Click 'Playlists' at any time to view the content saved in each Playlist you've set up.
16. Hit the 'Share This Playlist' button to send to friends and family. 

Speed Test Broadband Speed.io

    There is no doubt that if you want to check the speed of your broadband internet connection, you could go to various websites online which offer broadband speed test service for free. However Speed.io, although does the same job of measuring the broadband speed, is different in this league. It’s different because it has an elegant user interface which executes the job comprehensively, showing you the accurate download and upload speeds in Kbits and also the number of connections plus the ping or response time of the connection. It further classifies your connection on a scale of bad to excellent giving you an idea of the service which you are getting from your ISP.
     Yeah, you can see my internet connection is ‘ less good ‘ and it’s time I switch internet service providers ( if at all there’s a better ISP in my area Speed.io is flash based tool and also allows you to register for free and save the speed test results.

How To Speed Up Torrent Downloads 10 ways

           Imagine being on the autobahn with the accelerator down and then you realize that you are driving a wrecked car. The plight is not so uncommon on the information superhighway too. Torrent users would attest to the fact that half of our time is spent looking for ‘healthy’ torrents and the other half trying to download (and a bit of upload too) at the maximum speed. The former is mandatory; the latter thankfully is within the realm of tweaking. If you are the one who thinks that your torrent download speeds could do with a boost then keep reading. Below, you’ll find a few tips on how to speed up torrent download speed.

         1. Your ISP is where it starts Check the maximum download and upload speeds allowed by your ISP. Most ISP’s have specific bandwidths for both uploads and downloads. Obviously your torrent download speed won’t cross the cap set by the ISP. Go over to this article on Speed.io for broadband speed test and this one by Tina on ways to increase your connection speed. There are many other bandwidth testers like DSLReports which is included in the speed test within uTorrent.

         2. Choosing the right BitTorrent client Use the better clients out there like uTorrent, Vuze or the BitTorrent client itself. Wikipedia lists about 51 of them supporting the BitTorrent protocol. The choice of client used should always be updated to the latest version. The screenshots here depict uTorrent. The settings should be similarly configurable for other clients too. Mac users shuld also check our Transmission vs. uTorrent post.
         3. Go for healthy seeds and peers A peer is any computer participating in the download and upload of a torrent file. A seed (or seeder) is anyone who has one complete copy of the file being shared across the torrent network. A leech (or a leecher) is the person who does not have the complete file yet but has joined the network to download it. A leecher becomes a seeder when he downloads the entire file and then shares it across the network.
     For high torrent speeds, the best bet is in numbers. The greater the number of seeders, the healthier the torrent and the better the chance of higher speeds. The rule of thumb says to choose the torrent files with a high number of seeders and preferably lesser number of leechers i.e. a higher seed-leecher ratio.
         4.Get through the firewall Firewalls can block all incoming BitTorrent connections coming through. To ensure otherwise, a firewall should be manually configured to accept the connections and let it through the client. Windows XP has the Windows Firewall. Configure the firewall installed to accept the connections by checking the BitTorrent client on the allowed list i.e. Options – Preferences ““ Connection – check Add uTorrent to Windows Firewall. Also, check the Windows Firewall exception (if you keep it enabled) in your client too. Shutting down the firewall is not recommended as it leaves the computer open to attack.
    Note: If the home computer is behind a router, it also should be configured through the feature called Port Range Forwarding to enable torrent traffic. The router documentation should have specific information on this.
         5.Limit your upload rate A peer to peer network is all about sharing alike, but an unlimited upload rate hits the download rate too. Using the speed tests, find out your maximum upload speed and then set your client’s upload rate (Global Upload Rate in uTorrent) to about 80% of your maximum upload speed. You can also try varying your upload speeds ““ keep it high initially and then gradually bring it down towards the middle of the download. Note: Mind the speed units ““ it may be given in kilobits per second (kb/sec) or kilobytes per second (kB/sec). 1 kilobyte = 8 kilobit .
         6.Go to a different port The default port for the BitTorrent protocol is any between port numbers 6881-6999. ISPs throttle traffic on these ports as BitTorrent sharing involves high bandwidth usage. It’s easy to configure a different port in your torrent client. Use some number above 10000 to get around ISPs and also avoid problems with other applications. By default, the uTorrent port is randomized each time it starts. Set a specific port by not enabling the Randomize Port setting.
           7. Increase the number of Max Half Open TCP connections This figure specifies how many connections a torrent client should attempt to establish simultaneously at any given time. Windows XP with Service Pack 2 (SP2) or newer, limits this to a default of 10 as a barrier against virus multiplication. But that’s a bummer for torrent speeds as torrents too need a large number of simultaneous connections. A patch has been available for a while from LvlLord which modifies the TCPIP.sys file in Windows to allow a higher number of TCP connections.
    After running the patch, you have to set the number of connections in your torrent client. For example, in uTorrent go to Options ““ Preferences ““ Advanced – net.max_halfopen. Set any number from 50 to 100. But see that net.max_halfopen is set lower than the value set in TCPIP.SYS. Always check if it is still patched because Windows updates sometimes overwrite it.
               8. Experiment with Protocol Encryption Some ISPs love to act like Big Brothers and constrict bandwidth for P2P protocols. Protocol Encryption in most of the torrent clients helps to override this bandwidth shaping. Enable outgoing protocol encryption and put a checkmark on Allow Incoming Legacy Connections.
    With protocol encryption, ISPs find it difficult if not impossible to detect that the traffic is coming from BitTorrent. Experiment with enabled, disabled and forced options because you could be getting better speeds with encryption disabled. Non-encryption makes a torrent connection compatible with someone who is not using encryption but as a minus it makes the torrent detectable to an ISP with a bandwidth restricting policy.
             9. Bandwidth and connections Your BitTorrent client’s settings options will let you enter figures for ““ Global maximum number of connections gives the maximum number of connections that a BitTorrent client can make for any P2P exchange. Setting this too high does NOT mean higher speeds. Setting it too high would take up useless bandwidth and too low a figure would miss out on peers. For my 256kbps connection, I have a setting of 130. Maximum number of connected peers per torrent gives the maximum number of peers that a BitTorrent client can connect to for any P2P exchange. Experiment by setting this number close to the available peers for a particular torrent. For my 256kbps connection, I have a default setting of 70. Number of upload slots per torrent gives the maximum number of peers that a BitTorrent client will upload to for any P2P exchange. A low setting may affect downloads. For my 256kbps connection, I have a setting of 3.
    uTorrent has a Speed Guide which handily calculates the figures for a particular connection.
              10.Some common sense Most BitTorrent clients allow us to view the individual files in a download. You can selectively disable the download of files you don’t think necessary. Familiarize yourself with the customization settings of your particular client available in the Help files or at the website FAQs.

How to create a bootable Windows XP/Vista/7 Flash /USB/Pen Drive

The USB flash drive has replaced the floppy disk drive as the best storage medium for transferring files, but it also has its uses as a replacement for CDs and DVDs. USB drives tend to be higher in capacity than disc media, but since they are more expensive, they cannot (yet) really be used as a replacement. There are reasons why you would, however, choose a USB device over a DVD disc, and bootable software is definitely one of them. Not only is it faster to copy data such as setup files from a USB drive, but during usage the access times are also significantly faster. Therefore, installing something like Windows 7 will work that much faster from a USB drive than from a DVD (and of course, is particularly useful for the PCs without an optical drive; this isn’t something we should just leave for the piratesto enjoy). This guide will show you two different ways to create a USB flash drive that works just like a Windows 7 DVD. In order to follow this guide, you’ll need a USB flash drive with at least 4GB of free space and a copy of the Windows 7 installation disc. Windows 7 USB DVD Download Tool The easiest way to turn a USB flash drive into a bootable Windows 7 installer is by using the tool Microsoft offers, cunningly named the Windows 7 USB/DVD Download Tool. To get started, download the installer from Microsoft.com and follow the basic steps to put it onto your computer; you can put it on the computer you plan to install Windows 7 on or another one, it doesn’t matter.
Once it is installed, it should create an icon on your desktop, so double-click that to open. If you can’t find it, use the search function in the Start Menu with a keyword like “USB.” Launching it should give you the above screen, and step one is to find the Windows 7 .ISO file. The tool only accepts .ISO images, so we recommend that you convert yours if it’s in a different DVD image format.
Step two is straightforward: simply choose USB device.
In step three, all you have to do is make sure that you are choosing the correct USB device. If you have other data on the device, move it to your hard drive, another USB device, or somewhere else before proceeding
The tool will prompt you if it detects data on the device. Once your data is backed up elsewhere, click Erase USB Device.
You will get another prompt warning you that all the data will be wiped. Click Yes to continue
The format will be very quick, while the copying of the files will take a little bit more time (about 10 to 15 minutes).
Once the process is complete, you should get the above confirmation message. At this point you can close the tool and use the USB drive to install Windows 7. Remember that you’ll have to choose to boot off the USB drive. Before doing so, you may want to open up the USB drive and double click on setup.exe to see if everything looks okay. If you want to be able to do this manually, see the next section, and if you want to be able to install any edition of Windows 7, skip to the section after that.
Manual Creation of Bootable Windows Flash Drives

Maybe you don’t like that Microsoft violated the GPL with the first version of the above tool (the company has since GPLed the code), or you’re old-school and just love using the command prompt. Regardless of what your reasons are for creating a bootable Windows 7 USB drive manually, we have the scoop on how to do it. First, open the command prompt (if you use UAC make sure to right click it and choose “Run as administrator”), type “diskpart” without the quotes, and hit enter. You can also get here by simply typing “diskpart” without the quotes into the Start Menu and hitting enter.
Now type “list disk” without the quotes and hit enter. Take a look at the Size column and figure out which disk number your USB drive is. Ours is number 1, so we’re going to type “select disk 1″ without the quotes and hit enter. Now we’re going to wipe it by typing “clean” without the quotes and hitting enter (make sure to do a backup of the contents if you haven’t already).
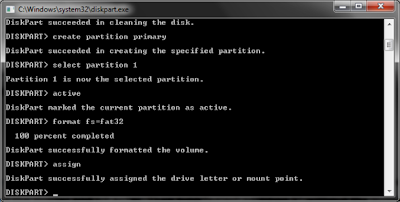
At this point we want to prepare the USB drive for the files and make sure it is bootable. Type “create partition primary” without the quotes and hit enter. Then type “select partition 1″ without the quotes and hit enter. Next type “active” without the quotes and hit enter. Finally, type “format fs=fat32″ without quotes and hit enter (if you choose to use ntfs, you’ll later have to run the “Bootsect.exe /nt60 G:” command to put boot manager compatible files onto your USB flash drive to make it a bootable device). This one will take a while, so go grab a snack, we’ll wait. When that’s done, type “assign” without the quotes and hit enter (this will assign a new drive letter to the USB flash drive).
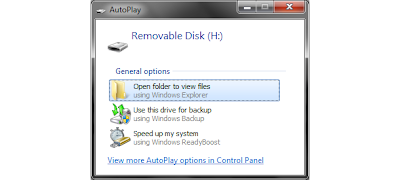
An AutoPlay window like the one above will appear. Remember the drive letter (in our case it is H:\), close the window, type “exit” without the quotes and hit enter. If you are working with an .ISO image, the best way to do this last part is to mount the file with a program like Virtual Clone Drive. Alternatively, you can extract the files from the .ISO image and simply copy them to the USB drive, but since we’ve been using the command prompt up to this point, we’ll show you how to do the last step with it as well.
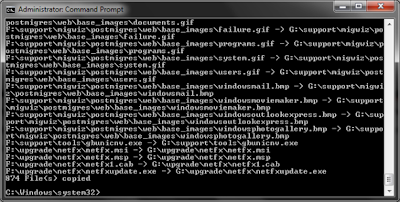
If you don’t have the command prompt open, open it with administrative privileges, type “xcopy f:*.* /s/e/f hg:” without the quotes and hit enter. Note that you will likely have to replace “f:” with the drive letter for your Windows 7 DVD and “g:” with the drive letter for your USB flash drive. Don’t worry if install.wim takes a while to copy: it’s easily the biggest file on the disc. Bonus: install any edition of Windows 7
This is a completely optional step and you only want to do this if you want to be able to choose which edition of Windows 7 to install. In the command prompt, type “del g:\sources\ei.cfg” without the quotes and hit enter (where g:\ is your USB flash drive).
This will make sure that your Windows 7 installer no longer has a specific version of Windows 7 set as the default, and you will be prompted to choose the version you want to install. Remember that while this gives you a more universal Windows 7 installer, you still need to make sure you are choosing the edition that you own, or you will not be able to activate Windows 7 with the key you have obtained.