Showing posts with label how to instal. Show all posts

Wednesday, February 6, 2013

How to install the 64-bit version of Office 365

The default installer for Office 365 is the 32-bit version. If you need the 64-bit version of Office, we'll show you how to get it.


                Office 365 is installed as a 32-bit program on your Windows PC by default. Microsoft recommends the 32-bit version, even on 64-bit systems, to avoid compatibility issues with third-party add-ons. However, there may be instances when you'd want the 64-bit version, like if you're using a very large database or worksheet. Here's how to install the 64-bit version of Office:

             Step 1: Go to Office.com and log in using your Microsoft account.
         Step 2: Click on the "My Account" shortcut.


         Step 3: Click on the "Language and install options" link under the Available Installs section.

            Step 4: Click on the "Additional install options" link.

            Step 5: In the version drop-down box, select 64-bit, then click the Install button.


           Step 6: Once you've downloaded the 64-bit installer, run the setup and complete the installation. That's it. Remember that you can't have both the 32-bit and 64-bit versions of Office installed at the same time. If you already have the 32-bit version installed, you'll need to uninstall it before installing the 64-bit version. For more details on the differences between the two versions, refer to Microsoft's documentation.

How to Install Windows 8

      Getting Started 

     1. The first thing to do, after choosing your victim machine, is to head to preview.windows.com or to http://windows.microsoft.com/en-US/windows-8/iso to get images you can burn to disc. If you're installing on a new partition or virtual drive, Microsoft recommends the first installer link rather than the ISO image for burning to disk or bootable USB. This is because the installer can burn the disc or create a bootable USB for you, and the downloader is faster (using compression) and more reliable. My contact for Microsoft explains it as follows: "Microsoft actually invented a new compression algorithm optimized for Windows images which makes the transfer faster, plus unlike an .iso download, they are doing dynamic error correction in the download to deal with dropped packets or bit-flips. This means that at the end of the installer download you will always have a bit-perfect copy, whereas it's possible you may have to download an .iso more than once if you're unlucky."


       The Setup is in general a more hand-held process, compared with burning an ISO image and installing with that.

Running the Upgrade Assistant 

     2. Before starting this process, make sure all your peripherals are connected and powered up so that Windows Setup can download the correct drivers for them.

     3. When you first click on the bright blue Download Windows 8 Release Preview button, you'll actually be downloading the Upgrade Assistant, which checks whether your hardware is compatible. You still have a choice between 32-bit and 64-bit architectures. At this point, I'm surprised the Microsoft hasn't fully moved to 64-bit, as Mac OS X has. Virtually all new machines are shipped with a 64-bit OS, and PC processors have nearly all been 64-bit-capable since AMD introduced x86-64 in 2003.


      4. The Upgrade Assistant will run through its system checks, and then create a report of what hardware works and what doesn't. If you're installing on a touchscreen PC, you may see a warning stating that your touch screen is not "Designed for Windows 8" and indeed, not every touch gesture may work. But on our 2-year-old HP TouchSmart, even though we got this message, the Windows 8 gestures worked surprisingly well. One of my reports on another machine said that I'd need to install an app to play DVDs, and that my hardware wasn't compatible with the faster Secure Boot feature of Windows 8. I could live with those stipulations.

      5. After this, the Upgrade Assistant shows the product key, which you'll need later. You can cut and paste this to an email for retrieval.

      6. Then the assistant will download the actual Windows 8 installer that suits your machine.

      Installation Itself 

      7. After selecting your language, you'll need to enter the product key provided earlier.


      8. Next you agree to the license terms. Note that by installing this pre-release version, you're consenting to send Microsoft usage data. After all, the point of the free preview is to get testing data and feedback to polish the final software.

      9. You next choice is between Upgrade and Custom. If you're upgrading from a previous Windows 8 preview, as in Developer or Consumer, you'll lose your existing files, but if you're upgrading from Windows 7, you'll be able to keep files, settings, and applications. It runs from the Desktop, even if you start in Metro. (If you're upgrading from Windows 8 Developer Preview or Consumer Preview, the next choice is "Choose what to keep," and the only option was "Nothing." After this, actual installation took place.)


The Custom choice lets you create a new partition and a multi-boot setup, so you can keep your old version of Windows and choose between it and Windows 8 at system startup. You'll also need to choose Custom if your PC is running an outdated operating system like Windows XP or if the disk contains no OS at all. Disk options in the Custom install setup path let you delete and format drive partitions.


      Pre-First Run Setup

      10. After the installer runs, you just have a couple tasks left. You choose a color combination for the start screen, a name for the PC (no spaces or funky characters allowed), and a Wi-Fi network. Of course, you don't have to log onto a wireless network: There's a "Connect to a wireless network later" option.


        11. Next you can either let the installer use Express settings or choose options for automatic updates, security, privacy (especially for your location data), and local network connections. Express settings will suit most users.

      12. Then it's time to log into a Windows account. This can be a Hotmail or Windows Live Messenger account, or you can create a new one using any email address on the spot. You have the option not to do so, but you'll definitely want to sign into your Windows 8 PC, since this will enable you to get more apps from the Windows Store and avail you of 7GB of free SkyDrive online storage. It also means you'll be able to sync settings and apps among multiple Windows 8 devices you log into.


      13. You'll then be asked for a security backup email address or mobile phone number. The setup page says that Microsoft will only use this for password recovery and account security.

      14. Next, you'll see a "creating your account" message, then "finalizing your settings," then "Your PC will be ready in just a moment." After this, you're ready to roll in the Windows Metro Start screen. To get started, remember that the corners of the screen are key for mouse input, and the Windows key on your keyboard is your friend, always taking you back to the Start screen. From here, too, you can just start typing to search for apps to run. There are over a dozen included with Release Preview, so you'll have plenty to explore, and you can add more from the hundreds of free third-party apps in the Windows Store.


      No Turning Back! 

One important final note about installing Windows 8 is that you can't undo it, unless you have recovery media. You can't even restore from a recovery partition—but you should be able to create recovery media from such partition if you need to. You can then use the Windows 8 installer to recover from the media. This is another reason why it makes sense to install on a separate partition or virtual machine.What if you Want Media Center, Too? In Windows 8, Windows Media Center is not included by default, and will be an extra cost item only available with the Pro edition. If you want to add it, you'll have to type "Add features to Windows 8" from the Start screen, with Settings selected. The choice will be to the right of all the Metro results. This launches the new desktop-based installer. You'll need the product key, which can be found in Microsoft's Windows 8 FAQ. For reference, it's MBFBV-W3DP2-2MVKN-PJCQD-KKTF7.

Then you accept the license terms, and hit "Add features." After a while of an "Adding features" message with progress animation, your PC restarts. You'll see the last and newest tile on you Metro Start screen will be for Windows Media Center, and running this opens the desktop app, which is nearly identical to the Windows 7 Media Center.

Monday, February 4, 2013

How To Root Samsung Galaxy S3 I747M On Android 4.1.1 Jelly Bean (UMBLL1) Official Firmware [Tutorial]

    
        The Android 4.1.1 Jelly Bean firmware update (I747MUMBLL1) was recently made available for the Samsung Galaxy S3, bearing model number I747M, in Puerto Rico.

        Those users, who are yet to upgrade their devices to the latest firmware build, can do it through over the air (OTA) update or KIES utility and also with the help of a manual installation process.

      In case you have already updated your Samsung Galaxy S3, the next thing you might be looking for is rooting the device on the updated firmware. Below is a tutorial showing how to root the Galaxy S3 I747M running on Android 4.1.1 Jelly Bean (UMBLL1) official firmware.

      The rooting procedure involves flashing CF-Auto-Root in your Galaxy S3 I747M on I747MUMBLL1 Android 4.1.1 Jelly Bean with the help of Odin. Users should note that rooting the device could void the warranty. But you can get it back by applying the official firmware update again.

Vital Points To Consider 

  •  There are chances of losing personal data and settings. Therefore, having proper backups is highly recommended. 
  •  The process is meant only for Samsung Galaxy S3 I747M. Therefore, the users are advised to check their devices’ model number in: Settings > About phone. 
  •  The device must have at least 80 percent of battery power. 
  •  USB Driver must be installed for Galaxy S3 in your computer and USB Debugging must be enabled. 
  •  WE cannot be held responsible for anything that goes wrong. Users should proceed at their own risk. 
Rooting Procedure 

Step 1 : Download CF-Auto-Root to root I747MUMBLL1 firmware [Filename: CF-Auto-Root-d2can-d2vl-sghi747m.zip] to your computer and extract the zip file.

Step 2 : Download Odin 3.07 and extract the file.

Step 3 : Switch off your phone and go to Download Mode on your phone. To do this, press and hold the Volume Down + Home buttons together and then press the Power button. After you see a warning screen, press Volume Down key to continue to enter Download Mode.

Step 4 : Run Odin 3.07 as Administrator and connect the phone to your computer via USB cable while in Download Mode.

Step 5 : If the phone is connected properly, you will see “Added” message in Odin. You will also see COM port with a number in Yellow.

Step 6 : Now click the PDA tab in Odin and select the CF-Auto-Root-d2can-d2vl-sghi747m.tar.md5 file.

Step 7 : In Odin, check the Auto Reboot and F. Reset Time options.

Step 8 : Click on the START button in Odin and it will start the flashing process.

Step 9 : Once the flashing is done, you will see a PASS message with green background in the left-most box at the top of the Odin. The phone will restart now. When you see the home screen, you can unplug the phone from the computer.

How to Root the Samsung Galaxy S I9000 (CF-Kernel Method)


        You can easily root any smartphone if it falls in the list of supported smartphones of CF-Kernel. Basically, it’s a custom kernel with Superuser and Buxybox injected and once you flash it on your device, you get the root access. Isn’t that simple? If you want to root your Samsung Galaxy S I9000 smartphone using CF-Kernel Method, follow our guide below.

 I. Before You Begin: 

 1. The warranty of your device will be voided once you root it. Therefore, do it at your own risk.

 2. Keep at least 60% of battery on your device, it will prevent any unexpected problems.

 II. Downloading Required Files:

 1. CF-Kernel (Download the appropriate file from the first OR second post)

 2. Odin 3 

III. Rooting the Samsung Galaxy S I9000 (CF-Kernel Method):

 1. Download and place both the files onto your Desktop.

 2. Extract files from both the archives to your Desktop.

 3. Open the Odin Tool by double-clicking on the Odin executable file. It’s the file you just extracted from the archive.

 4. Click on the PDA tab and navigate to your Desktop and choose the .tar file you extracted from the CF-Kernel archive.

 5. Turn OFF your smartphone.

 6. Reboot it into the Download mode. It can be done by pressing and holding the Volume DOWN+Home+Power buttons together.

 7. Use the Volume UP button to enter the Download mode.

 8. Once you’re in the Download mode, connect the device to your PC using the USB cable.

 9. Uncheck the Repartition box in the Odin if its checked.

 10. Click on the Start button and flashing should begin.

 11. Your device should reboot once the flashing is finished.

 12. You’re now rooted ! Awesome! You’ve successfully rooted your device with the help of a custom kernel, called CF-Kernel. It has injected both Superuser and Root access on your device, which means you can now provide root access to the apps asking for it !

How to Root Samsung Galaxy S2 i9100 – Easy Steps

        After the great success of Samsung Galaxy S, Samsung has launched Samsung Galaxy S2 which is also knows as Samsung Galaxy S i9100. Samsung Galaxy S2 having processor of 1.2 GHz dual-core processor, Adreno 220 GPU, Qualcomm MSM8660 chipset with 1 GB of RAM.
        XDA Developers has launched many exciting ROMS and mods for Samsung Galaxy S2 which takes Samsung Galaxy S2 to the new experience level, in other words the more customising level. Though to take the benefit of this, you will have to root your Samsung Galaxy S2.

Procedure To Root Samsung Galaxy S2: 

Points to be Noted Before Proceeding:

 1. You may brick your phone, if the instructions will not follow carefully.

 2. Warranty will be void by rooting the device but you can get it back by unrooting the phone.

 3. Downloads all needed Tools/software.

 4. Samsung Galaxy S2 should had updated to the latest firmware XWKDD.

 5. Battery of the phone had charged properly atleast to the half level.

 6. You may lost the device data, so make a backup of all the data like messages, call history, pictures etc before rooting process.

 7. Save the APN Setting, it will be needed after the root process to surf the internet again.

 8. The updated USB driver of device should be installed on system to communicate properly with the device.

Tools Needed:

 1. ODIN Downloader (Download it from here)
 2. USB Data Cable
 3. XWKDD Kernel (Don’t extract it after download, it will use in the Odin process)
 4. Download SuperOneClick
 5. Download Samsung’s KIES 2.0 (Download links: Link1 , Link2 )
 6. And Ofcourse, A Personal Computer(PC) or Laptop.

Procedure: 

  • Step one : First of all make sure that you have download and install all the needed software. Then, Put device in USB debugging mode: Settings ->Applications -> Development -> USB debugging. 
  • Step Two : Reboot your device in the download session mode. To get enter in the download mode of Samsung Galaxy S2, switched off the device and turn it on again by holding Volumedown button + Home button and Power button simultaneously. You will surely reach to the download mode. You can get yourself confirm by identifying same as below mention picture as on your phone screen.
  • Step Three : Open the ODIN Downloader which you had downloaded and installed it on your pc.
  •  Step Four : Now, with the help of USB Cable connect the device to the computer while keeping the Odin open then wait for the few seconds then odin notified you that the device is connected to the computer. Select the checkboxes next to “Auto reboot” and “F. Reset Time” and kept default else options. After all this, press “PDA” Button and select the XWKDD_insecure.tar file which you have downloaded on your pc before. Now Press “Start” button, after this pressing the start button ODIN will flash the kernel and after flashing it phone will reboot. Becareful, don’t dare to disattach the device from computer while rebooting.
  • Step Five : Once the device has been restarted, Open SuperOneClick and press the “Root” tab and restart the device again. After it, you will successfully rooted the your Samsung Galaxy S2 device. The Rooting process has been completed here and now you can gain benefits of using custom roms and apps of Samsung Galaxy S2 without any hesitation or restriction. If you will find any issues in rooting your Samsung Galaxy S2 then you can get help by asking questions in the comment section available below.

Wednesday, January 30, 2013

How to create a bootable Windows XP/Vista/7 Flash /USB/Pen Drive

The USB flash drive has replaced the floppy disk drive as the best storage medium for transferring files, but it also has its uses as a replacement for CDs and DVDs. USB drives tend to be higher in capacity than disc media, but since they are more expensive, they cannot (yet) really be used as a replacement. There are reasons why you would, however, choose a USB device over a DVD disc, and bootable software is definitely one of them. Not only is it faster to copy data such as setup files from a USB drive, but during usage the access times are also significantly faster. Therefore, installing something like Windows 7 will work that much faster from a USB drive than from a DVD (and of course, is particularly useful for the PCs without an optical drive; this isn’t something we should just leave for the piratesto enjoy). This guide will show you two different ways to create a USB flash drive that works just like a Windows 7 DVD. In order to follow this guide, you’ll need a USB flash drive with at least 4GB of free space and a copy of the Windows 7 installation disc. Windows 7 USB DVD Download Tool The easiest way to turn a USB flash drive into a bootable Windows 7 installer is by using the tool Microsoft offers, cunningly named the Windows 7 USB/DVD Download Tool. To get started, download the installer from Microsoft.com and follow the basic steps to put it onto your computer; you can put it on the computer you plan to install Windows 7 on or another one, it doesn’t matter.
Once it is installed, it should create an icon on your desktop, so double-click that to open. If you can’t find it, use the search function in the Start Menu with a keyword like “USB.” Launching it should give you the above screen, and step one is to find the Windows 7 .ISO file. The tool only accepts .ISO images, so we recommend that you convert yours if it’s in a different DVD image format.
Step two is straightforward: simply choose USB device.
In step three, all you have to do is make sure that you are choosing the correct USB device. If you have other data on the device, move it to your hard drive, another USB device, or somewhere else before proceeding
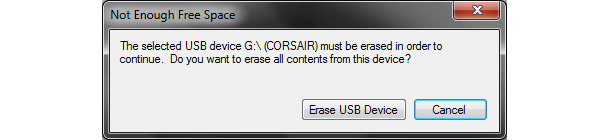
The tool will prompt you if it detects data on the device. Once your data is backed up elsewhere, click Erase USB Device.
You will get another prompt warning you that all the data will be wiped. Click Yes to continue
The format will be very quick, while the copying of the files will take a little bit more time (about 10 to 15 minutes).
Once the process is complete, you should get the above confirmation message. At this point you can close the tool and use the USB drive to install Windows 7. Remember that you’ll have to choose to boot off the USB drive. Before doing so, you may want to open up the USB drive and double click on setup.exe to see if everything looks okay. If you want to be able to do this manually, see the next section, and if you want to be able to install any edition of Windows 7, skip to the section after that.
Manual Creation of Bootable Windows Flash Drives

Maybe you don’t like that Microsoft violated the GPL with the first version of the above tool (the company has since GPLed the code), or you’re old-school and just love using the command prompt. Regardless of what your reasons are for creating a bootable Windows 7 USB drive manually, we have the scoop on how to do it. First, open the command prompt (if you use UAC make sure to right click it and choose “Run as administrator”), type “diskpart” without the quotes, and hit enter. You can also get here by simply typing “diskpart” without the quotes into the Start Menu and hitting enter.
Now type “list disk” without the quotes and hit enter. Take a look at the Size column and figure out which disk number your USB drive is. Ours is number 1, so we’re going to type “select disk 1″ without the quotes and hit enter. Now we’re going to wipe it by typing “clean” without the quotes and hitting enter (make sure to do a backup of the contents if you haven’t already).
At this point we want to prepare the USB drive for the files and make sure it is bootable. Type “create partition primary” without the quotes and hit enter. Then type “select partition 1″ without the quotes and hit enter. Next type “active” without the quotes and hit enter. Finally, type “format fs=fat32″ without quotes and hit enter (if you choose to use ntfs, you’ll later have to run the “Bootsect.exe /nt60 G:” command to put boot manager compatible files onto your USB flash drive to make it a bootable device). This one will take a while, so go grab a snack, we’ll wait. When that’s done, type “assign” without the quotes and hit enter (this will assign a new drive letter to the USB flash drive).
An AutoPlay window like the one above will appear. Remember the drive letter (in our case it is H:\), close the window, type “exit” without the quotes and hit enter. If you are working with an .ISO image, the best way to do this last part is to mount the file with a program like Virtual Clone Drive. Alternatively, you can extract the files from the .ISO image and simply copy them to the USB drive, but since we’ve been using the command prompt up to this point, we’ll show you how to do the last step with it as well.
If you don’t have the command prompt open, open it with administrative privileges, type “xcopy f:*.* /s/e/f hg:” without the quotes and hit enter. Note that you will likely have to replace “f:” with the drive letter for your Windows 7 DVD and “g:” with the drive letter for your USB flash drive. Don’t worry if install.wim takes a while to copy: it’s easily the biggest file on the disc. Bonus: install any edition of Windows 7
This is a completely optional step and you only want to do this if you want to be able to choose which edition of Windows 7 to install. In the command prompt, type “del g:\sources\ei.cfg” without the quotes and hit enter (where g:\ is your USB flash drive).
This will make sure that your Windows 7 installer no longer has a specific version of Windows 7 set as the default, and you will be prompted to choose the version you want to install. Remember that while this gives you a more universal Windows 7 installer, you still need to make sure you are choosing the edition that you own, or you will not be able to activate Windows 7 with the key you have obtained.